One of the rails project I worked with required me to get VirtualBox up and running with the following specs: Ubuntu 14.04 server amd64 on a 2GB RAM 2 core VM with VT-x/ AMD-v.
And in there, I had to set up ruby via RVM, install a lot of extra tools and ruby gems. To make things easier for me I used port forwarding.
Port forwarding allows remote computers (for example, computers on the Internet) to connect to a specific computer or service within a private local-area network (LAN) - according to wikipedia
One benefit of using port forwarding is that it allows you to run tasks on the command-line without having to work directly in VirtualBox by using your host terminal.
First thing I did was to install the OpenSSH client applications on Ubuntu
sudo apt-get install openssh-server
Then to setup a port forwarding into the guest’s port 22 so I can access it from my host terminal.
-
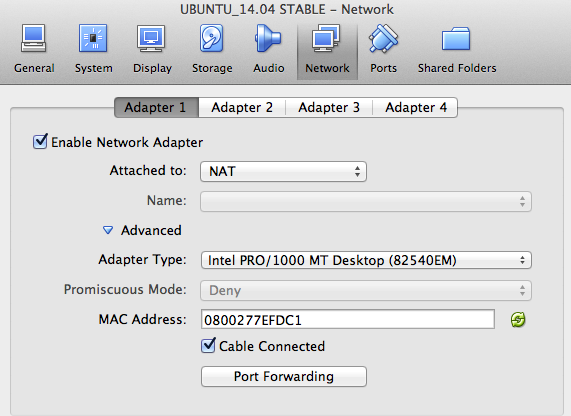
To enable port forwarding, open the settings for your Virtual Machine (For OS X)
You can do this from the VirtualBox Manager, choose Settings(found on the top left) -
Select the Network tab

- Make sure that NAT is selected in the Attached to: selector.
- Click on the Port Forwarding button.

-
Pick a port on our Host, for example 2222, and forward TCP connections received on this port, to port 22/TCP (SSH) on our guest. (To do this, click on the green (+) button on the right).
- Host IP is set to nothing - this is on purpose, and is equivalent to saying 0.0.0.0. However, it does mean that ANY MACHINE that can access your Host on TCP port 2222 will be able to talk to the SSH on your guest.
- Theres no need to change the Guest IP so leave it blank.
- Now confirm all the changes and click ok
- Restart the Virtual Machine so the changes are applied
Now you should be ready to connect to the guest.
Note: Make sure you have created a username on your guest. You cannot log in as root using SSH`
Start your VM. In your terminal enter:
ssh [user_name]@127.0.0.1 -p 2222
or
ssh -l [user_name] -p 2222 127.0.0.1
Don’t forget to replace [user_name] with the user you created.
You will be prompted to accept the host key so be sure to enter yes. Then finally you’ll be prompted to enter the password for the username:
[user_name]@127.0.0.1's password:
Enter your password and you should now be logged in!
Now you should be able to run commands in the terminal without going into the VM directly. Great for running specs for your rails applications or adding new gems and tools.
